
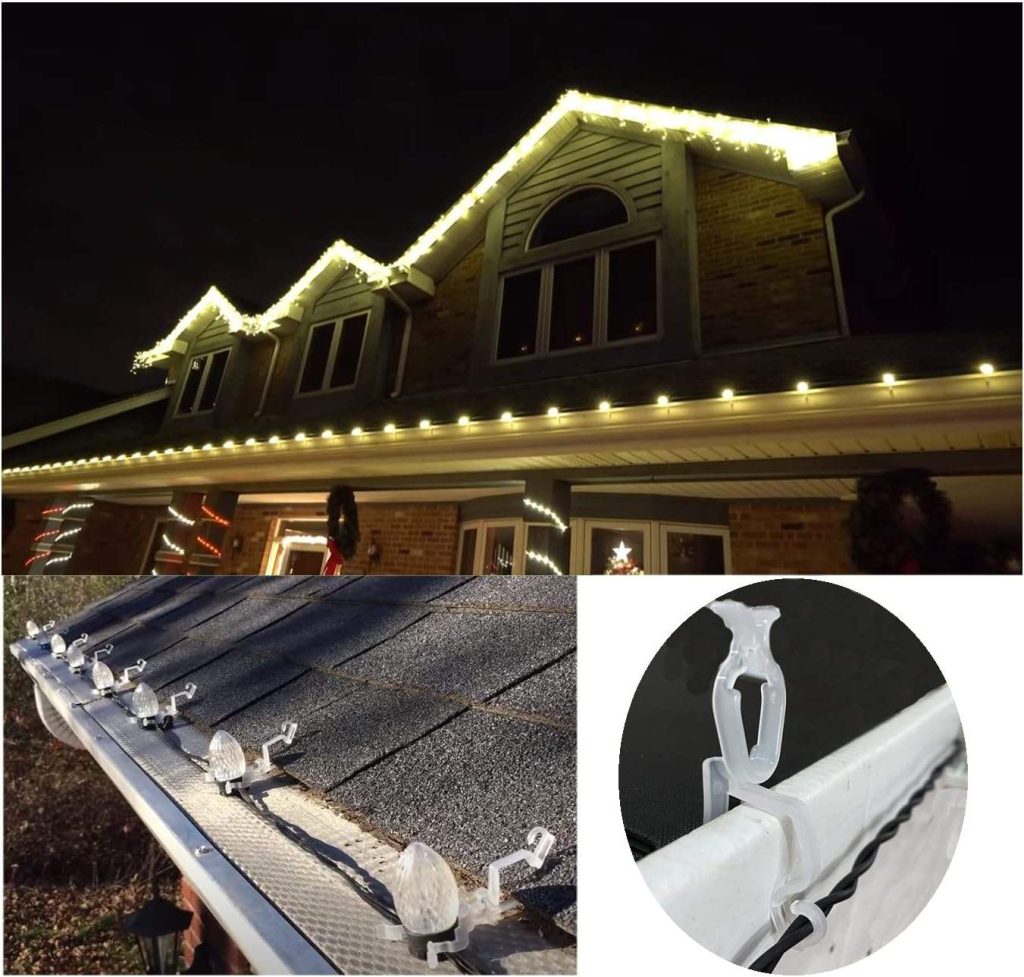
- Max run per power source: 150 ft (C9 LED), 200 ft (C7 LED), 40-50 ft (12V pixel lights)
- Power injection spacing: Every 100 ft (LED stringers), every 40-50 ft (12V pixel)
- Wire gauge: 18AWG SPT-2 standard; 16AWG for runs exceeding 150 ft
- Clip spacing: 12 inches (C7), 15 inches (C9)
- Cost per linear foot: $0.85-$1.20 installed (LED stringers)
- Crew time (200 ft roofline): ~4 hours with bulk spools vs. 6-7 hours with pre-cut strings
- Circuit capacity: 15A circuit = ~1,500 C9 LED bulbs (0.96W each)
Success in commercial lighting installation comes down to one thing: efficiency on the ladder. Whether you are hanging C7 bulbs on a residential eave, running 300 feet of C9 stringers across a commercial rooftop, or installing permanent pixel lights for a year-round client, the contractor who finishes first gets the next job.
This guide answers the five questions contractors ask us most often when planning a roofline lighting project — plus a bonus section on permanent pixel light installation for contractors expanding into year-round lighting.
What Materials Do I Need for a Commercial Roofline Lighting Installation?
A typical commercial roofline project requires five core components, all of which we manufacture in-house at Andysom:
- Bulb spools — C7 (E12 base) or C9 (E17 base) bulk spools let you cut exact lengths with zero waste
- LED retrofit bulbs — C7 SMD or C9 SMD bulbs, 50,000+ hour lifespan, IP65 rated
- Vampire plugs (slide plugs) — for custom-length extension cords between roof sections
- Roof clips — shingle clips or gutter clips depending on the roof type
- 18AWG SPT-2 zip cord — available in bulk spools for power injection and jump lines
For a 200-foot commercial roofline, a typical material list includes 200 feet of C9 stringer, 100 C9 LED bulbs, 20 vampire plugs, 200 gutter clips, and 50 feet of zip cord for power injection. Total material cost typically runs $0.85 to $1.20 per linear foot installed.
For permanent pixel light installations, the material list shifts to: pixel light strands (12V RGBW or 120V addressable), aluminum mounting channels, IP67 power supplies, T-shape power injection connectors, and low-voltage landscape wire (10-16AWG depending on run length).
How Do I Plan Power Injection for Long Roofline Runs?
This is the question that separates experienced contractors from beginners. Voltage drop is the number one cause of dim bulbs and callback complaints on commercial installations.
LED String Lights (C7/C9)
For C9 LED installations on 18AWG SPT-2 wire, here are the practical limits we recommend based on 16 years of manufacturing experience:
- Maximum run per power source: 150 feet for C9 LED, 200 feet for C7 LED
- Power injection points: Add one injection point every 100 feet for consistent brightness
- Wire gauge: 18AWG is standard for most residential and light commercial. For runs exceeding 150 feet, step up to 16AWG
- Total wattage: Calculate at 0.96 watts per C9 LED bulb (0.08A at 120V). A 15-amp circuit safely supports 1,440 watts — roughly 1,500 C9 LED bulbs
Permanent Pixel Lights (12V)
For 12V pixel light installations, voltage drop happens much faster due to the lower voltage. Key guidelines:
- Maximum run per power injection: 40-50 feet for 12V pixel lights (vs. 150+ feet for 120V LED stringers)
- Power injection points: Every 40-50 feet, using T-shape connectors to tap into the main power line
- Wire gauge: 14-16AWG for main power runs, 18AWG for pixel light pigtails
- Controller placement: Install the controller centrally to minimize the longest data line length
Pro tip: Always map your power injection points before climbing the ladder. Mark them on your site plan with tape. A 10-minute planning session saves 30 minutes of ladder repositioning.
Shingle Clips or Gutter Clips — Which Should I Use?
The clip is the foundation of a straight, professional-looking installation. The wrong clip means sagging lines, damaged shingles, or callbacks after the first windstorm.
Use shingle clips when: The roof has asphalt or composite shingles. Shingle clips slide under the shingle tab and grip the bulb socket. They hold tight without penetrating the roofing material, which keeps roof warranties intact. This is the standard choice for 80% of residential and light commercial jobs.
Use gutter clips when: The installation runs along gutters rather than the roofline itself, or when the roof has metal or tile shingles where shingle clips will not slide underneath. Gutter clips snap onto the gutter lip and hold the bulb at a consistent height.
Use magnetic clips when: The installation surface is metal (metal roofs, flashing, gutters). Our magnetic C7/C9 light hooks offer dual horizontal and vertical mounting — ideal for metal surfaces where traditional clips fail.
Spacing rule: Regardless of clip type, space clips at 12-inch intervals for C7 and 15-inch intervals for C9. This prevents sagging and keeps the line visually straight from the street.
How Do I Cut Spools to Exact Length Without Waste?
This is where bulk spools give contractors a massive advantage over pre-cut string sets. Pre-cut strings come in 25-foot or 50-foot lengths, which almost never match the actual roofline. You end up with 5 feet of extra wire dangling or, worse, a gap that requires a second string.
With bulk spools from Andysom, the process is simple:
- Measure each roof section — measure from corner to corner, including any vertical drops between roof levels
- Add 6 inches per end — this gives you room for the vampire plug connection
- Cut the spool to length — use wire cutters, not scissors
- Attach vampire plugs — slide the plug onto the cut end, press the contact blade through the wire insulation. No stripping required. This is why they are called vampire plugs — they “bite” through the insulation
- Install bulb sockets at regular intervals — push-in sockets install in seconds without tools
- Screw in LED bulbs last — this prevents bulb breakage during handling
Using this method, a two-person crew can complete a 200-foot commercial roofline in approximately 4 hours, compared to 6-7 hours with pre-cut strings. That 30% time savings is real money on multi-job days.
Installing Permanent Pixel Lights: A Quick Overview
More contractors are adding permanent pixel lighting to their service offerings. The installation process differs from traditional string lights:
- Mount aluminum channels along the eave using screws or adhesive — this is the permanent mounting track
- Feed pixel light strips into the channel, pressing them into the snap-in groove
- Plan power injection every 40-50 feet (12V systems) — use T-shape connectors to tap into the main power bus
- Connect the controller (WiFi/Bluetooth/RF) and configure zones using the manufacturer’s app
- Test each zone before sealing connections — verify color consistency and addressable sequencing
- Weatherproof all connections using silicone grease and heat-shrink tubing on exposed joints
For a detailed comparison of pixel light options, see our guide on RGB vs RGBW permanent pixel lights and our manufacturer selection guide.
What Is the Most Common Installation Mistake and How Do I Avoid It?
After 16 years of manufacturing lighting for contractors across North America, the single most common mistake we see is: not testing each section before moving the ladder.
It sounds obvious, but in the rush of a busy installation season, crews often wire up an entire roofline, plug it in at the end, and then discover a dead section three stories up. Now someone has to climb back up, find the bad connection, fix it, climb down, test again. That is 45 wasted minutes on a job where every minute counts.
The fix is simple: test every section from the ladder before moving it. Plug in each 50-foot run as soon as it is wired. If all bulbs light, move on. If not, the problem is right in front of you, at ladder height, not 30 feet up on the roof.
Second most common mistake: overtightening the wire. SPT-2 wire is designed to have slight slack between clips. Pulling it drum-tight puts stress on the socket connections and causes premature failure. Leave a quarter-inch of slack at each clip.
Third: ignoring weatherproofing on pixel light connections. Even IP68-rated pixel lights can fail if the connection points between strands are exposed to standing water. Always use silicone grease on connectors and elevate junction points above the roofline where possible.
FAQ: Commercial Roofline Lighting Installation
Q: How many C9 LED bulbs can I run on one circuit?
A: A standard 15-amp circuit safely supports 1,440 watts. At 0.96W per C9 LED bulb, that’s approximately 1,500 bulbs — far more than most rooflines require. The real limit is usually the wire gauge and run length, not the circuit capacity.
Q: Can I install permanent pixel lights on a metal roof?
A: Yes. Use adhesive-backed aluminum channels or screw-mounted tracks designed for metal roofing. Avoid piercing the metal panels — use butyl tape or appropriate roofing adhesive. Our aluminum channel tracks are compatible with most metal roof profiles.
Q: What’s the difference between SPT-1 and SPT-2 wire?
A: SPT-2 has thicker insulation (0.045″ vs 0.030″), making it more durable for outdoor use and better at handling voltage over long runs. For commercial installations, we recommend SPT-2 exclusively. See our bulk zip cord spools.
Q: How do I calculate power injection for pixel lights?
A: For 12V pixel lights, plan one power injection point every 40-50 feet. Calculate total wattage by multiplying pixels per foot × watts per pixel × feet of run. Size your power supply at 80% of rated capacity maximum. Use our MeanWell IP67 power supplies for reliable outdoor performance.
Q: Should I offer permanent pixel lights or traditional string lights to my clients?
A: Both. Traditional C7/C9 string lights are ideal for seasonal holiday installations. Permanent pixel lights serve clients who want year-round ambient lighting plus holiday color shows. Offering both lets you capture seasonal and permanent installation revenue. Read why smart contractors are switching to permanent lighting.
Need Help Specing Your Next Project?
Andysom manufactures the complete C7 and C9 lighting system — spools, stringers, LED retrofit bulbs, vampire plugs, clips, and zip cord — plus the full permanent pixel light system with channels, power supplies, and controllers. Everything ships from our own factories in China, Vietnam, and Cambodia, color-matched and quality-tested.
Whether you are planning your first commercial roofline job or scaling a holiday lighting business, we can help you spec the right materials.
Request a quote → Or reach out directly: email zoya@andysom.com, WhatsApp +86 188 2288 5445.
Zoya Ban is the content marketing lead at Andysom, a professional Christmas lights and permanent pixel lighting manufacturer with self-owned factories in China, Vietnam, and Cambodia. She has helped hundreds of contractors source reliable lighting materials for commercial installations.
Related Products
- LED Pixel Light Aluminum Channel Track — Custom extrusion rail for eave mounting
- Magnetic C7 C9 Light Hooks — Dual horizontal & vertical installation
- Low Voltage T Shape Power Supplement Connector — For eave light power injection
- Low Voltage Landscape Wire — 10/12/14/16AWG SPT-3 cable
- MeanWell Potted IP67 Power Supply — 12W-600W for outdoor installations
- C9 Light Spools E17 Stringer — Commercial-grade bulk spools
Related Articles